
Leaderboard
.thumb.png.573424dca099f94733865bd8286986b1.png)

Popular Content
Showing content with the highest reputation since 07/01/2025 in all areas
-
The website is too bright and it needs a "dark mode" to make it more comfortable for us. I made a very simple example in GIMP. The white parts are changed to value 95, the availability box to 90 and background is set to 80. Even this minor change makes it more comfortable to look at, while it doesn't impact the overall design. This would be a good enough start, but others may like even darker mode.
 4 points
 -

Disco Elysium - 60hz/60fps Camera Stutter Fix
jensenhrx and 3 others reacted to saber-nyan for a file
Binary diffed old version of DLL, done some IDA Pro research, got some patches for 2024-11-27 version! 60 FPS: Disco Elysium 2024-11-27 60FPS.xdelta 90 FPS: Disco Elysium 2024-11-27 90FPS.xdelta 200 FPS: Disco Elysium 2024-11-27 200FPS.xdelta4 points -
.thumb.png.573424dca099f94733865bd8286986b1.png)
Tutorial for creating widescreen fixes
gooddoyou and 3 others reacted to AlphaYellow for a topic
So, I've noticed nobody talks about modding old games here, so I'll break the tradition. Many people know old games have many issues running on newer monitors with aspect ratios different from what they used to be designed for, like 4:3 and 5:4, including no support for any kind of widescreen or wider resolutions, or when they do, they have a fixed field of view or it gets reduced with a wider resolution. Many old engines have the option to set a widescreen resolution, but just don't expose it to the user through the in-game settings, so editing through the Registry or external .ini/.cfg/.xml or other similar kind of files might be needed. Usually when it's not possible to edit settings through external files or through Registry, it's needed to edit the executables themselves or other files around it directly (usually it can be DLLs, but not only), by using softwares that can edit the code in those files in hexadecimal form, like the so-called hexadecimal editors, or hex editors for short, or even using memory scanners/debuggers like Cheat Engine. Why widescreen fixes matter Many beloved PC games from the 1990s and early 2000s were designed for 4:3 or 5:4 monitors. On modern widescreen displays (16:9, 21:9, even ultrawide), they either stretch, letterbox, or simply refuse to launch at anything beyond their legacy resolutions. By applying a few straightforward tweaks - editing config files or hex‑patching executables - you can unlock native widescreen support, restore proper field of view (FOV), and keep the originals looking their best. 1. Check for built‑in widescreen support Before diving into hex editing, see if the game already supports custom resolutions: 1. In‑game settings: Browse graphics or display options. 2. Config file entries: Look for resolution, width or height in .ini, .cfg or .xml files in the game folder or the Documents folder (either user one or public one). 3. Registry keys: Search under HKEY_CURRENT_USER\SOFTWARE\<GameName> or HKEY_LOCAL_MACHINE\SOFTWARE\<GameName>, or even look for the publisher or developer names as well. 2. Editing external config files When settings aren’t exposed in menus, try this first: Locate the file: Common names include settings.ini, user.cfg, or graphics.xml. Open in a text editor: Notepad++ or VS Code are ideal. Modify resolution lines: width = 1920 height = 1080 Save and test: Launch the game and verify. If it crashes or reverts, restore your backup and proceed to the next step. Tip: Always make a copy of the original file before editing. 3. Hex‑patching the executable If no external file can be changed, you must patch the game binary: Backup the EXE/DLL: Copy game.exe (or relevant DLLs) to a safe folder. Open in a hex editor: HxD (free) or 010 Editor (paid) work well. Search for known resolution values: 640x480 = 80 02 00 00 & E0 01 00 00 (little‑endian) 800x600 = 20 03 00 00 & 58 02 00 00 Replace with your resolution: For 1920x1080 use 80 07 00 00 and 38 04 00 00. Save and test: Run the game; if it fails, revert to the backup. Warning: Hex patching can permanently corrupt executables, so always work on copies. 4. Adjusting aspect ratio and field of view Even when resolution changes, the FOV may stay locked: Aspect ratio values: Some engines store a float (e.g. 1.3333 for 4:3). Look for 3F AA AA AB (IEEE‑754 for ~1.33) and replace with 3F 99 99 9A (~1.777 for 16:9). The value might be from the division of width by height or even the inverse, height / width. FOV multipliers: Search for common degree values (60° = 3C 70 00 00, in radians or as a multiplier). Increase by the ratio of new AR to old. Usually, the field of view is defined in the main executable or a DLL, most times close to where the far and near clip planes are calculated, see here for some documentation about clipping planes. DLL hooks: Enthusiast patches (e.g. Widescreen Fixer on GitHub) automate this by injecting a DLL at runtime. 5. Using memory scanners/debuggers & editing assembly When config file or simple hex patches aren’t enough, you can dive deeper with memory scanners (e.g. Cheat Engine) and debuggers/disassemblers (e.g. x64dbg, IDA Pro). This lets you locate values in RAM at runtime, inject code, or permanently patch the game’s machine code. 5.1 Memory Scanning with Cheat Engine Launch & attach Start the game and open Cheat Engine. Click the computer icon and select the game’s process. Finding values in RAM Exact Scan: If the game’s running at 800x600, scan for the integer 600 (4‑byte). Filtered Scan: After changing resolution in‑game to 1024x768, scan again for 768 - this narrows down candidate addresses. Pointer Scan: Once you’ve isolated the runtime address, use “Pointer scan for this address” to locate the static pointer chain. This lets you reapply your patch each launch without rescanning. Freezing or modifying values Double‑click the found address to add it to your table. Change its value to 1080 (for 1920x1080) or check “Active” to freeze it. Tip: Values can be stored as floats (e.g. FOV multiplier) or doubles—try scanning “Unknown initial value” and change the in‑game setting to filter. 5.2 Patching assembly in memory Instead of just editing data, you can hook the code that reads or writes to it: Find the instruction Right‑click your found address in CE → “Find out what accesses this address.” CE will break into the debugger showing the instruction(s) (for example, mov [eax+0x10], ecx). Code injection Use “Auto Assemble” in CE to inject a small script that overrides the value or skips a clamp routine. Example of a CE script to bypass a clamp at address 0x00401000: [ENABLE] aobscanmodule(CLAMP, GameX.exe, 89 91 10 00 00 00) alloc(newmem,2048,GameX.exe+401000) label(returnhere) newmem: mov [ecx+0x10], dword ptr [esi] // set custom width jmp returnhere GameX.exe+401000: jmp newmem returnhere: [DISABLE] CLAMP: db 89 91 10 00 00 00 dealloc(newmem) Saving this script in CE lets you enable it each play session. 5.3 Permanent assembly patching in EXEs/DLLs To avoid running scripts every time, you can patch the binary or DLL directly: Disassemble the module Load game.exe (or the relevant DLL) into IDA Free, Ghidra, or x64dbg. Identify the routine that handles resolution, aspect‑ratio clamping, or FOV calculation. Understand the Machine Code Little‑Endian: Multi‑byte immediates appear reversed in hexadecimal. Instruction Length: You cannot overwrite an instruction with a longer one without shifting downstream code; you may need to fill with NOPs (0x90) or use a jump instruction to a codecave that the game doesn't make use of. Apply the Patch Example: original bytes at 0x00401000: 0F 8C 1A 02 00 00 jl 0x40121C ; clamp if width < min To skip the clamp, change 0F 8C (JL - jump if larger) to 90 90 (NOP NOP), NOP means no operation, so the CPU won't execute anything and will continue execution after those: 90 90 1A 02 00 00 Save the patched binary or DLL and test. Warnings: Backups are mandatory. Keep copies of every original module. Checksums & signatures: Some games verify executable integrity, patching may trigger anti‑tamper or anti‑cheat and cause crashes or bans. Packers/compressors: If an EXE is packed (UPX, Themida), unpack it first or your patch may never be reached at runtime. 5.4 Best practices & cautions Always work on copies. Never patch a live install. Document your changes. Keep a changelog of offsets, original bytes, and replacements. Watch for side effects. Skipping a clamp may break UI layout or cause rendering issues. Legal considerations. Patching code for personal use is generally tolerated, but distribution of modified executables can violate EULAs. Community resources. Search forums (e.g. XeNTaX, PCGamingWiki) to see if others have already mapped the same functions. EDITING FILES So to start editing files, a hex editor like it was mentioned above is needed. Usually HxD is a good choice, it's not too hard to learn and has all that's needed for a hex editor. 1. First open the file you want to edit on it either by dragging the file onto the HxD window, or press Ctrl+O and open it from there. 2. Then, when the file is opened, it's time to search for values. First press Ctrl+F, this window will appear, if wanting to find a hexadecimal number, change the datatype to "Hex-values", for integer numbers it's "Integer number" and for floating point numbers like those shown in the "Aspect Ratio" section, change it to "Floating point number". 3. Let's take this example for Lego Racers 2. The game only supports the following resolutions by default: 640x480, 800x600 and 1024x768. 5. To find the right resolution, it's needed to find both width and height values that are close enough to eachother in a file. For that, this program made by myself can be used to determine that: https://github.com/alphayellow1/AlphaYellowWidescreenFixes/releases/tag/utilities 6. Put the downloaded executable in the same folder where the game exe is, run it, put the executable name, write one of the resolutions the game supports, set the byte search range to 15 and type Enter. 7. Since the 800x600 resolution has the least amount of close enough pairs in the executable (just 1), we'll go with it. 8. Go back to HxD, press Ctrl+G and search for the address that was found for the width: 0002A912 (just for info, each pair of numbers or letters represents 1 byte, so the highlighted value below is 2 bytes long). 9. 9. Highlight it, then go to the right side of the window in the "Data inspector" tab, and go to the row where it says Int16. 10. Change it to the desired width, and type Enter. 11. Do the same for the height, highlight the value in the right address you found in the program above and change the value in the Int16 row at the right side. Save the file. 12. Now inside the game, we can see the new resolution that was changed earlier above now appears in the graphics settings, but if it doesn't appear, just set it to the one you changed before (so change it to 800x600 and the resolution in-game will change to the one you set in the file). 13. Now during gameplay we can check the proportions look correct but the camera view looks cropped in relation to 4:3, which means the field of view is reduced with wider resolutions, this scaling behavior is called Vert-, because the vertical field of view is reduced to accomodate the new aspect ratio. This means we have to increase it. 14. For the field of view, it was found the game stores FOV values as degrees, and after some experimentation, it's found the value is 90º. Note that in some games, they might store FOV for different areas of the game in more than one place, it might be either the same value as normal gameplay one, or might be a different FOV value altogether, like using one FOV for menus and another FOV for gameplay, or even different FOVs for each mission. For first-person games, they might store a FOV value for the camera and another one different altogether for the weaponmodel. Also cutscenes might have its own FOV assigned to it (either a universal FOV value for cutscenes, or even different FOV values inside the same cutscene, or each type of cutscene having its own FOV), so beware. 15. In HxD, press Ctrl+F, change the tab to "Floating point number" and type 90, change "Search direction" to "All", and click in "Search all". 16. All the found 90 values are listed below: 15. To edit each value, double click on one of the results below, and then go to the right side, and change the value in the "Single (float32)" row. You can try editing each value to a much higher one like 130, noting in which address the value is before changing it (see the second screenshot below this one), then saving the file, starting the game and going into gameplay, and seeing if the FOV became much higher, then if not, closing the game and coming back to HxD, changing the value back to 90 in the address you noted before, and going to the next value and doing the same process again until the camera FOV changes in-game. 16. It won't take long to find out it's the second value responsible for the camera FOV ingame, highlight it and change the value according to WSGF's FOV calculator: https://www.wsgf.org/fovcalc.php . Leave it as it is, and change the "number of monitors across" to 1, and change the resolution to the desired one above (in my case it's 1920x1080). 17. Copy the value after where it says "New hFOV =", only copy the number in bold. Also note that if the standard FOV isn't 90º but another number, you can change the number that is after "Old hFOV:" to that one to get the correct FOV for your aspect ratio. 18. After copying the number in step 17, go back to HxD and paste it in the "Single (float32)" row of the second address that was found in the first screenshot of step 15. 19. Now going back in-game, we can see the resolution and field of view were successfully changed and the game is fixed! ADVANCED EDITING THROUGH MEMORY HACKING If changing resolution or FOV values in files doesn't change anything in-game, then memory scanning/debugging softwares like Cheat Engine and code disassemblers like OllyDbg and x32dbg are needed. I'll expand on this section later.
4 points -
Version 1.2
2,262 downloads
This mod enables a custom variable that helps with camera and animation stuttering in the game. No additional tools needed. The existence of this variable was discovered by Alex Battaglia from Digital Foundry's team. You can read the full article and watch the video about it here Unzip and drop the files in the game's executable folder ( <path-to-game>\SwGame\Binaries\Win64). The fix comes enabled by default but you can use SurvivorAnimationStutterFixLite.ini to disable / enable the fix or the logging. This mod is developed for Patch 9. Use Version 1.1 if you're having problems enabling the mod with 1.2. This older version uses a different injection method based on UE4SS instead of memory injection. It includes a lightweight version of this program needed to run the console and set the variable to 1. Thanks to ThirteenAG for Ultimate ASI Loader as it is used as dll injection method and to UE4SS project for the alternative method. The lifelong battle against stuttering is a heavy burden, but it ultimately yields magnificent results.3 points -
I have left your posts alone, but hidden, over the last couple of months in an attempt to see if you were actually able to improve your attitude. So if you want someone to blame, blame me instead of people with no involvement into the matter. And that said, I do not approve of threats, either to myself or others, so I will be upgrading your wiki ban to an actual full ban, affecting your community privileges as well as your SSO account. You are not welcome here while having this kind of attitude so I recommend you forget about contributing to the PCGamingWiki project and finding another community project to engage with instead.3 points
-

Massive collection of old PC game patches
ailpenguins and 2 others reacted to Aemony for a topic
I can’t tell if you *have* patches you want uploaded or if you *want* patches to download…? Anyway, there’s a FilePlanet archive.org mirror with a ton of content: https://archive.org/details/archiveteam-fileplanet3 points -

Hitman Contracts - Silver Contracts Patch
gottwald and 2 others reacted to silverkeeper for a file
Version 1.0.0
1,378 downloads
This patch includes most changes done by Hitman Contracts Unofficial Patch up until v1.2, updating, changing or omitting some of them. Look at "Unofficial patch changelogs.txt" for reference; this Readme outlines every difference, in any case. Since v1.3 Hitman Contracts Unofficial Patch introduced AI upscaled textures, probably to balance the addition of Blood Money's higher definition textures. They look pretty bad; even 47 and the restored women and gang biker bartender skins got upscaled. On top of that, the mugshots of the targets in the pause menu got corrupted somehow in v1.4. iSsueS hasn't touched their patch since 2023 and these, ahem, issues bothered me to no end, so with a miraculous backed up v1.2 Unofficial Patch and GlacierTEXEditor I digged into the patch's files to decide what was worth leaving in. Install instructions For starters, backup your game folder if you are copy-and-replace-click-happy. Every .zip in the game and logo videos will get replaced. Copy everything inside the "COPY THIS CONTENT TO THE GAME FOLDER" and do just that. This patch doesn't include the Widescreen patch or EAX support, you'll have to open the v1.4 Unofficial Patch .exe as a compressed file to extract the necessary files. It also includes custom configuration (such as setting resolution to 800x600, more on why on the note below) and keybinds. Don't replace HitmanContracts.cfg and HitmanContracts.ini if you want to keep yours. Lastly, both d3d8to9 and DXVK wrappers have been added. The former is aimed for Windows while the latter is for Linux, but you can try both as a Windows user. Copy the content of their respective folders to the game folder. Note about discarding the Widescreen patch and EAX The former causes more issues than it's worth. UI scaling is non-existent, making text extremely tiny; loading screen artwork looks glitched, and graphical effects don't scale well. 800x600 is the highest resolution where UI scale looks correct. As for EAX, I couldn't manage to make it work for the life of me. I'm running the game on Linux with Wine so I can't test this for Windows. But I've tried the latest DSOAL and OpenAl releases, as well as some Windows registry stuff necessary since W10... Credits - iSsueS for their fixes in Unofficial Patch - BurntShrimp for compiling all the current fixed OpenGL effects to the DX renderer as an .asi patch: https://www.vogons.org/viewtopic.php?p=1364362#p1364362 Changelog v1.0 - .exe with fixed graphical effects replaced by .asi patch compiled by BurntShrimp from VOGONS forum, making separate .exes for Steam and GOG releases unnecessary. - Ultimate ASI Loader v9.0.0 included for the .asi patch; check their repository for valid filenames of the injected .dll file, in case you want to use another mod that uses the "dinput8.dll" filename. - Added d3d8to9 v1.13.0 and DXVK v2.7.1 wrappers. - Save folder included in the main mod for rare cases where the installer doesn't create it, which prevents saving between missions at Professional difficulty. Optional 100% completed save from Unofficial Patch included in a "Completed_Save" folder. - Null brand & logo video files from Unofficial Patch included. Makes the game boot with the Contracts intro video. - All fixed, non-upscaled textures since Unofficial Patch v1.2 included. Highlights: unused High Definition 47 skin in Contract's files, Blood Money snipercase texture, PS3 uncensored character skins. - Unused blood decals in the Training level have been imported to all Contracts missions. Discarded the Blood Money decals in Unofficial Patch as a result. - Vanilla Main Menu logo without the Unofficial Patch footer restored, while keeping the fix for the weird white line in vanilla's texture.3 points -
Version 1.0.3
30 downloads
This package contains a widescreen fix for Medal of Honor: Pacific Assault. Installation Extract all files into the game's installation directory and use mohpa_setup.exe to set the resolution. Features Unlocks all screen resolutions in the resolution selector. Scales the field of view (FOV). The scaling factor can be configured in scripts/MedalFixer.ini. Fixes stretched 2D interface elements. Skips the intro videos. Allows the frame rate limit to be customized. Fixes the aspect ratio of pre-rendered videos. Fixes loading screen scaling. Removes black bars from cutscenes. Removes the black bars from the pause menu. Notes Aspect ratios wider than 16:9 may exhibit visual issues. EA app version may refuse to load the mod.2 points -
The Sting! - FOV Fix
superb_lobster and one other reacted to AlphaYellow for a file
Version 1.0.2
131 downloads
Comes with a RAR file, which includes an ASI plugin intended to fix the aspect ratio in the action puzzle game "The Sting!" (2001), since the game stretches the view at resolutions with an aspect ratio wider than 4:3. This fix supports the English, German, Spanish, Polish and Russian versions. Source code available here: https://github.com/alphayellow1/AlphaYellowWidescreenFixes/blob/main/source/fixes/TheSting!FOVFix Credits also go to: AuToMaNiAk005 Instructions: 1. Extract all files to the game folder. 2. Download ThirteenAG's Ultimate ASI Loader (32-bit version of dinput.dll), and also extract it to the game folder. 3. Set the desired resolution to fix the stretching and FOV factor in TheSting!FOVFix.ini. Issues: - Mouse hitbox/input remains misaligned to the original 4:3 area, so clicks register offset horizontally.2 points -
Nosferatu: The Wrath of Malachi - Widescreen & FOV Fix
uprighthorse3 and one other reacted to AlphaYellow for a file
Version 1.2
709 downloads
Comes with a RAR file, which includes an ASI plugin intended to fix the resolution and aspect ratio in the survival horror first-person shooter game "Nosferatu: The Wrath of Malachi" (2003), since the game only supports limited 4:3 resolutions (800x600, 1024x768 and 1280x960). This fix, unlike jackfuste's one, allows both resolution and FOV to be fully customized. Source code available here: https://github.com/alphayellow1/AlphaYellowWidescreenFixes/blob/main/source/fixes/NosferatuTheWrathOfMalachiWidescreenFix Instructions: 1. Extract all files to the game folder. 2. Download ThirteenAG's Ultimate ASI Loader (32-bit version of winmm.dll), and also extract it to the game folder. 3. Set the desired FOV factor in NosferatuTheWrathOfMalachiWidescreenFix.ini. 4. Run nosshell.exe and choose the desired resolution from the list (the game has to be run through it to apply the newer resolutions).2 points -

Add field for non-widescreen aspect ratios within Video
gooddoyou and one other reacted to TheGershon for a topic
Is not the point of having a community-driven wiki-styled site that entries can get updated over time? Plenty of (most?) pages have multiple data entries with the Unknown state, typically Multi-monitor under Video, Other Controllers under Input, Royalty-free audio under Audio, etc. I see no reason why this couldn't join the ranks of 'underutilized on a majority of pages, but still nice to have'. Alternatively, this could be an optional expansion under Widescreen Resolution, or just not appear on pages where it hasn't been explicitly entered in (this might be an editing faux pas though, idk). My point is, there're multiple ways this could be implemented unobtrusively, even if potentially not widely populated across the site.2 points -
Version 1.0.0
268 downloads
This file contains a widescreen fixer for a game called: Alpha Protocol. Works for any version of the game. Unpack into the game folder and check the .ini for the settings. Features: FOV changer HUD and Menu correction2 points -
Version 1.0.0
125 downloads
This file contains some widescreen and field of view improvement for the Steam version of Sunset Overdrive. Unpack it into game folder and set the desired resolution in SunsetFixer.ini. If you don't set resolution in the .ini file the fix will use the desktop resolution. Use the keys to adjust the FOV in-game. Default keybindings: / enable the FOV fix * disable the FOV fix + increase the fov - decrease the fov2 points -

Pivotal Games Fixer
apolloconflict and one other reacted to zoli456 for a file
Version 1.4.1
864 downloads
This file contains improvements for games made by Pivotal Games. Copy the data from the corresponding folder into the selected game. Start the game with admin rights. Common Features: Resolution selector unlocked FOV scaling and optional multiplier in the scripts/ConflictFixer.ini The game won't disable certain settings if you use dgvodoo Initial Discord rich presence support Contains wrappers to fix compatibility problems Conflict: Desert Storm Framerate limited to 60 to prevent timing anomalies It disable the framelimit on the loading screen to decrease loading times Conflict: Desert Storm 2 Framerate limited to 60 to prevent timing anomalies The main menu slightly changed to fix the misaligment on widescreens Conflict: Vietman Framerate limited to 60 to prevent timing anomalies Upscaled video pack available here Installing the upscaled video pack raise the frame limit in the main menu 25->60 Conflict: Global Storm (Global Terror) Multiplayer restored via Openspy Automatic portforwarding using UPnP The game uses bigger fonts in unsupported resolutions Upscaled video pack available here Installing the upscaled video pack raise the frame limit in the main menu 25->60 Conflict: Denied Ops Multiplayer restored via Openspy Automatic portforwarding using UPnP The Great Escape Skip the company logos Framerate limited to 60 to prevent timing anomalies The game doesn't skip rendered videos Fix the journey and the page turn animation Upscaled video pack available here Notes: The manual video skipping in The Great Escape may require 2 or more slow mouse clicks. Using BandiCam tend to cause crashes.2 points -
Version 1.1.0
297 downloads
This file contains some general improvements for a game called Scooter pro. Unpack it into the game directory. Features: Resolution selector is unlocked Aspect ratio is fixed The frame rate limited to 60 Field of view is fixed and possible to set a multiplier in scripts/ScooterFixer.ini The game use the WASD keys instead of the arrow keys HUD is partially fixed2 points -
Version 1.9.3
25,308 downloads
Features: Allow custom resolutions Fixed FPS cap Skip startup logos Skip credits Skip auto save warning Noise filter disable Custom save folder Konami code hotkey Increase heap and file limits Unpack: Use 7-Zip or WinRAR to unpack the zip file. Credits: glockroach - Testing Install: 1. Copy all the files to your Metal Gear Rising: Revengeance install folder. 2. Configure your options in Metal_Gear_Rising_Revengeance_PCFix.ini. (Optional) 3. Start the game. Install (ReShade, Steam): 1. Copy Metal_Gear_Rising_Revengeance_PCFix.dll, Metal_Gear_Rising_Revengeance_PCFix.ini and steam_api.dll to your Metal Gear Rising: Revengeance install folder. 2. Configure your options in Metal_Gear_Rising_Revengeance_PCFix.ini. (Optional) 3. Start the game. Install (ReShade, GOG): 1. Rename the original steam_api.dll to steam_api_GOG.dll 2. Copy Metal_Gear_Rising_Revengeance_PCFix.dll, Metal_Gear_Rising_Revengeance_PCFix.ini and steam_api.dll to your Metal Gear Rising: Revengeance install folder. 3. Configure your options in Metal_Gear_Rising_Revengeance_PCFix.ini. (Optional) 4. Start the game. Password:pcgw2 points -
Broken Sword 3: The Sleeping Dragon - FOV Fix
jankotfcg1996 and one other reacted to AlphaYellow for a file
Version 1.2
544 downloads
Comes with a RAR file, which includes an ASI plugin intended to fix the aspect ratio and field of view in the adventure game "Broken Sword 3: The Sleeping Dragon" (2003), since the game stretches the view at resolutions with an aspect ratio wider than 4:3. Source code available here: https://github.com/alphayellow1/AlphaYellowWidescreenFixes/blob/main/source/fixes/BrokenSword3TheSleepingDragonFOVFix Instructions: 1. Extract all files to the game folder. 2. Download ThirteenAG's Ultimate ASI Loader (32-bit version of winmm.dll), and also extract it to the game folder. 3. Set the desired resolution to fix the stretching and FOV factor in BrokenSword3TheSleepingDragonFOVFix.ini.2 points -
Turok (2008) - FOV Fix
jankotfcg1996 and one other reacted to AlphaYellow for a file
Version 1.0
300 downloads
Comes with a RAR file, which includes an ASI plugin intended to fix the field of view in the sci-fi first-person shooter game "Turok" (2008), since the game crops the view at resolutions with an aspect ratio wider than 4:3 (Vert-). It's possible to increase the FOV through TurokInput.ini, but aiming down sights is turned off at higher FOVs than standard one, and also the FOV gets reset after a new mission is loaded or when the player dies, unlike this fix, which keeps the same FOV throughout the whole game and allows a custom ADS FOV. Source code available here: https://github.com/alphayellow1/AlphaYellowWidescreenFixes/blob/main/source/fixes/Turok2008FOVFix Instructions: 1. Extract all files to the game folder. 2. Download ThirteenAG's Ultimate ASI Loader (32-bit version of dinput8.dll), and also extract it to the game folder. 3. Set the desired resolution to fix the cropping and FOV factor in Turok2008FOVFix.ini.2 points -
I tried adding this line to a game's page, but it seems this function doesn't exist on the PC wiki.2 points
-
Over the Hedge - Widescreen & FOV Fix
ShiftyPanda and one other reacted to AlphaYellow for a file
Version 1.1
132 downloads
Comes with a RAR file, which includes an ASI plugin intended to fix the resolution, aspect ratio and HUD in the third-person action-adventure game "Over the Hedge" (2006), since the game only runs at limited 4:3/5:4 resolutions by default. Source code available here: https://github.com/alphayellow1/AlphaYellowWidescreenFixes/blob/main/source/fixes/OverTheHedgeWidescreenFix Instructions: 1. Extract all files to the game folder. 2. Download ThirteenAG's Ultimate ASI Loader (32-bit version of winmm.dll), and also extract it to the game folder. 3. Set the desired resolution and FOV factor in OverTheHedgeWidescreenFix.ini.2 points -
Version 1.0.0
68 downloads
This fix contains improvements for a game called: Bad Boys: Miami Takedown. Use a DRM free version of the game. Unpack the archive into the game folder. Features: Resolution selector unlocked Fps limit changer Fov changer and ability to set a multiplier2 points -
Backyard Skateboarding - Widescreen & FOV Fix
PCGamerKC and one other reacted to AlphaYellow for a file
Version 1.3
194 downloads
Comes with a RAR file, which includes an ASI plugin intended to fix the resolution, field of view and HUD in the third-person skateboarding game "Backyard Skateboarding" (2004), since the game runs at 640x480 only in the original and at 640x480/800x600 in the GOTY edition. Source code available here: https://github.com/alphayellow1/AlphaYellowWidescreenFixes/blob/main/source/fixes/BackyardSkateboardingWidescreenFix Instructions: 1. Create a folder in the game folder called "scripts". 2. Inside it, create a file named "global.ini" and put the following contents inside it: [GlobalSets] LoadPlugins=1 LoadFromScriptsOnly=1 3. Extract the fix files to the newly created "scripts" folder. 4. Download ThirteenAG's Ultimate ASI Loader (32-bit version of dinput8.dll), and extract it to the root game folder. 5. Set the desired resolution and FOV factor in BackyardSkateboardingWidescreenFix.ini.2 points -
2 points
-

[GOG Version] Beyond Good & Evil Widescreen Fix (by nemesis2000)
Futil1ty and one other reacted to arhumSearcher for a file
This version of the widescreen fix is outdated (dated 2016). There was a newer version made in 2019 that can still be downloaded by opening up his site in Wayback machine then copying the download link and removing the web archive part from the link (original MEGA download link so it still works) dunno if pcgw allows links but here: https://mega (dot) nz/ #!q8hWVKyI!eyDyd92xUXX-y2z5oCmC4egTHlGJth0h47mnYScg1yY2 points -

Add field for non-widescreen aspect ratios within Video
gooddoyou reacted to bedstraweve for a topic
I like the idea, though I wonder how difficult it would be to keep accurate over time. Especially since patches and updates sometimes add or remove aspect ratio support later on. Would this be community-maintained or editor-maintained?1 point -
Did you try this mod? Does it have any issues? https://www.nexusmods.com/legostarwarsthecompletesaga/mods/1651 point
-
Dead Rising 2/Dead Rising 2 Off the Record Controller Fixes
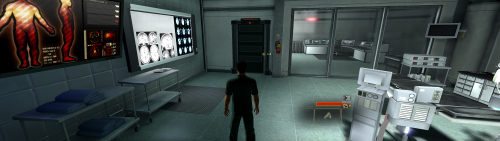
Jonaand reacted to fixenhancers for a file
Version 1.0.0
89 downloads
These fixes sort out the controller issues on both Dead Rising 2 and Dead Rising 2 Off The Record. Information This is a library to add X-Input support into games with broken or missing controller support. Instructions Dead Rising 2 Download Dead Rising 2 Controller Fix and put d3d9.dll and d3d9.ini files in the directory of the game next to deadrising2.exe. Inside the d3d9.ini you can fully customise the inputs you wish to use. Everything is all explained in the ini file, you can also use [hotkey]keycodes.txt provided in the fix to help you with the codes needed for specific keys. Dead Rising 2 Off The Record Download Dead Rising 2 Off The Record Controller Fix and put d3d9.dll and d3d9.ini files in the directory of the game next to deadrising2otr.exe. Inside the d3d9.ini you can fully customise the inputs you wish to use. Everything is all explained in the ini file, you can also use [hotkey]keycodes.txt provided in the fix to help you with the codes needed for specific keys. If you experience double input A possible effect of this fix can be that in some cases it will make the original games native X-input work again in your game. In that case it is important to note that in this fix for each input inside of the .ini file you can put = NONE For example A = NONE B = NONE You can do this for every input on the Xbox controller in the d3d9.ini file. This will then completely disable the custom (chip-xinput) layer for the game but the native X-Input will still work. You can either put NONE for each key as in the example above OR at the top of the d3d9ini set output = 0 Otherwise you would have an xbox button doing 2 inputs inside of the game e.g: Native A = Jump in game + Chip X-Input = LMB in game at the same time Issues/Problems If you have any issues, with the fixes then please go to discord for help linked below. Fix Enhancers Discord Server Fix Enhancers Fix Enhancers Website “Creating compatibility fixes and enhancements for legacy PC games.” Chip – Founder, Reverse Engineer, Programmer, Developer, Game Preservationist JokerAlex21 – Founder, Admin, Tester1 point -
The Cat in the Hat - Widescreen & FOV Fix
jankotfcg1996 reacted to AlphaYellow for a file
Version 1.0
41 downloads
Comes with a RAR file, which includes an ASI plugin intended to fix the resolution and aspect ratio in the platform game "The Cat in the Hat" (2003), since the game only supports 800x600 by default. Source code available here: https://github.com/alphayellow1/AlphaYellowWidescreenFixes/blob/main/source/fixes/TheCatInTheHatWidescreenFix Instructions: 1. Extract all files to the game folder. 2. Download ThirteenAG's Ultimate ASI Loader (32-bit version of dinput.dll), and also extract it to the game folder. 3. Set the desired resolution and FOV factor in TheCatInTheHatWidescreenFix.ini.1 point -

No Man's Land (2003, PC) modding / unpacking
Emperorsfist reacted to ikskoks for a topic
If you're still interested in RDA archives from No Man's Land game, here's a quick bms script that will extract and import data for you https://github.com/bartlomiejduda/Tools/blob/master/NEW Tools/No Man's Land/No_Mans_Land_RDA_script.bms Here's the tutorial on how to use it: https://ikskoks.pl/tutorial-what-is-quickbms-how-to-export-and-import-with-quickbms/ Enjoy 🙂1 point -
Version 2.1.0
34,143 downloads
Features: Allow custom resolutions Allow 30 FPS in cutscenes Disable Maximized Windowed Mode on newer Windows versions DirectX 12 Support Restore missing hauntings Increase the resolution of background screens Increase FOV Fix map aspect ratio Disable system check Disable safe mode Disable cutscene borders Modify blur effect PS2 like brightness Anisotropic Texture Filtering Invert X and Y axis Modify sensitivity Use HKEY_CURRENT_USER instead of HKEY_LOCAL_MACHINE Install: 1. Copy all the files from the GOG or Retail folders to your Silent Hill 4 install folder. 2. Configure your options in Silent_Hill_4_PC_Fix.ini. (Optional) 3. Start the game with SILENT HILL 4.exe. Credits: dns - Silent-Hill-4-Wide-Screen-Patch WidescreenFixesPack team HunterStanton Password:pcgw Note: Windows 11 update KB5064081 (August 29, 2025 Preview) have broken FMV playback in Silent Hill 4, they play corrupted.1 point -

Assassin's Creed IV: Black Flag Ultrawide and Multimon Hack
jankotfcg1996 reacted to WSGF for a file
71,593 downloads
Archive password is PCGW Black Bars FIX: Depending on aspect ratio replace AC4BFSP.exe and AC4BFMP.exe in the game folder Ultra/Super-Wide (21:9/32:9) Specific Solution & Issues Black Bars FIX: Depending on aspect ratio replace AC4BFSP.exe and AC4BFMP.exe in the game folder Eyefinity / Surround Specific Solution & Issues Forced triple wide version: Replace AC4BFSP.exe in the game folder1 point -
 Add the "The game engine may allow for manual configuration of the game via its variables. See the engine page for more details." bullet point for Unreal Engine 3 to Template:Video.1 point
 -

Marc Eckō's Getting Up : Xbox Visual Effects
misticjoker reacted to Patrxgt for a file
Interesting. I've checked out some gameplays too and I can actually confirm that some sections do miss fog and rain effects on PC, so your mod might be one of those essential ones. I'll add it to the game's main article.1 point -

Close to the Sun FOV changer
Rose reacted to undeadwolf for a file
!!THIS FILE CONTAINS SEVERAL VIRUSES. DO NOT DOWNLOAD. malware warning!!!!1 point -
102 dalmatians no longer works on windows 10???
szehang reacted to fixenhancers for a topic
Yeah Elisha's DxWrapper is an important wrapper for this game Its included in this https://www.pcgamingwiki.com/wiki/102_Dalmatians:_Puppies_to_the_Rescue#Issues_fixed aswell :)!1 point -
Spider-Man 2: The Game - FOV Fix
mr. obsolete 341 reacted to AlphaYellow for a file
Version 1.2
702 downloads
Comes with a RAR file, which includes an ASI plugin intended to fix the field of view in the action game "Spider-Man 2: The Game" (2004), as the game's engine, Unreal Engine 2, crops the image at resolutions with an aspect ratio wider than 4:3 (Vert-). Source code available here: https://github.com/alphayellow1/AlphaYellowWidescreenFixes/blob/main/source/fixes/SpiderMan2TheGameFOVFix Instructions: 1. Extract all files to <path-to-game>/System/. 2. Download ThirteenAG's Ultimate ASI Loader (32-bit version of winmm.dll), and also extract it to <path-to-game>/System/. 3. Set the desired resolution to fix the cropping and FOV factor in SpiderMan2TheGameFOVFix.ini.1 point -
 Will Tom Clancy's Splinter Cell: Chaos Theory be available on GOG.com? Only the first game in the series is available on GOG.com.1 point
 -

Resident Evil 7 {Project Ethan}
kamiccolo reacted to OakSorcerer for a file
Thank you! Just decided to replay it after Village, and stretched 2D is awfully looking. It's a must-have one! 🤝1 point -

Proposal: "Debloated" Installs (Remove unused files)
mateusauri reacted to EVERGREEN for a topic
Today more than ever, (fast) storage space is expensive. One thing that always makes me mad is the insane amount of unused Localizations, game modes (often dead/closed multiplayer modes) that are installed by default - this is literally dead content. Wasted storage. Wasted money. Now back in ye old days, it used to be a gigabyte at best. Not the end of the world, and not exactly worth the time investment. But old habits die hard, and I'm still doing it today. With games becoming larger and larger, storage has become an issue that can thankfully be alleviated. I'm going to list a few interesting examples, then propose a solution and finally suggest a way to integrate it to PCGW's structure. I'll also list a couple of issues with my proposal, potential flaws and uses cases etc. If you have a better idea or any suggestion to make this a thing, you're more than welcome. Please note that all the numbers given are taken from Steam, but GoG, Uplay, EGS & Origin are guilty of the very same thing. Uplay's even worse, as always. Any constructive feedback would be much appreciated - I never suggested a feature before, but this one has been on the back of my mind for at least a year. I feel like it could be very useful to many folks out there. So, let's get to it. Those are easy ones to "clean-up" (more on that later): Batman Arkham Origins. Had a multiplayer mode, servers are down. Delete one folder and the install size goes from 27.06Gb to 18.1Gb. 9Gb (33%) saved Final Fantasy XIII. Well documented, check the PCGW entry for it, you can remove ~20Gb if you don't want the Japanese audio. 57.6Gb to 37.7Gb. 19.9Gb (52%) saved (!!!) Doom 2016. Do you really play the MP or Snapmap modes? That's ~15Gb (11Gb if you only delete the MP) saved. From 69.68Gb to 54.68Gb. 15Gb (21.5%) saved Here's the problem. I can manually delete all localizations, "deluxe edition content", Readme/Support and redists safely from most MT_Framework, UE3 and Ubi games just fine because they use the same naming conventions. All I have to do is search in the root folder for any file with the _ita. suffix for instance and delete it - but that's because I know what I'm doing and I'm willing to take the time to locate and delete those files. Listing that would massively bloat any page of course, and not many users would do it anyways. The best way I can think of to implement a reliable and simple method to delete files that we're absolutely sure are safe to delete goes something like this: Add a "debloatable" boolean to the Other Information infobox, If True, how much can be shaved-off at best. Users like myself could build a database of games we know we can "shave" (much like SK/ReShade compat, with a dedicated page) The end user would download a batch file, hosted here and verified by members based on a template which would include one option for each localization, and a "clean-up" option (remove Readme, Deluxe content, redists if safe) So for instance, I can flag all the localization for Resident Evil 6 and write them down in the dedicated page. I don't have any experience making modular batch files like that however, so someone else would have to make a template. I can then edit that batch to point it to all the files we want to delete. The end user launches the batch file, delete all locales but the one he's/she's using and boom. That's money saved right there. I know there are programs that are much better than Win Explorer's Search feature - if we can feed such a program with a config file it should do the trick too. We'd still need to build a database though. I do realize that I make it sound much easier than it may be, or that it may sound overkill if we're talking about a Gb at best. But for extreme cases like Doom 2016, Far Cry 3/4, FF XIII, the Arkham series, The Evil Within - huge games basically, it would be very helpful and hey, I'm already doing it anyways so might as well share it. There's also games like Battlefront 2 (2005) where you can cut the install size in half. It's about 5Gb (vanilla) if memory serves, about 2-3Gb when cleaned. With that said, if anything I hope that this thread at least brings more attention to this issue. Last but not least, to everyone: Happy holidays! I hope you're all doing well, and ready for more PCGW grunt work for this year to come. "Keep on keeping on".1 point -
@sourceror Thanks for the feedback, I will look into it. Edit: It works on my end in path "C:\Code\COD2\data" and can't reproduce it. Try the following: 1.Open the "CoD2MP_s" exe file with e.g hex editor or cff explorer and change -> "WINMM.dll" to "patch.dll" -> save. 2.Rename winmm.dll to patch.dll file and test if it changes anything Sounds strange in any case. If anyone reads this and also has the same problem, please contact me.1 point
-
Batman: Arkham Origins - PS3 Exclusive DLC
kishinmukito reacted to Patrxgt for a file
1,684 downloads
Mod for the Batman: Arkham Origins, that ports the PS3 exclusive DLCs (Knightfall DLC + One Million and New 52 Metallic skins) to the PC version of the game Installation: See this section in the PCGamingWiki's article about the game. Credits: Weffette - Original creator of this mod Me - Repacking to reduce file size, fix for the "Run as Administrator" problem and re-upload here for preservation purposes1 point -
Unfortunately it doesn't work on versions different from the English one. Is there a way to fix this?1 point
-
I use Deluminate for Chrome so that's not a problem for me, but I do agree the site really needs a Dark theme, ideally something that can be toggled from the user settings.
1 point
-

We need a "dark mode" for the website
rodrog reacted to Suicide machine for a topic
Good idea, but sites like awful like this 😞 Has issues in the same places where I had it when I tried overriding styles.1 point -
The file is now available from the files section:1 point
-

Devil's Hunt ultrawide & multimonitor mod
jankotfcg1996 reacted to Rose for a file
Version (game version 0.0.4)
976 downloads
Unpack the applicable archive and use the tool to patch the exe in \DevilsHuntUnreal\Binaries\Win64\ within the main folder. This will remove the pillarboxing from the gameplay, menu screens and cutscenes. Tested with the latest GOG version at 2560x1080 and 5760x1080. You can buy me a coffee here.1 point -
Also, i noticed that the gogmix of games hasn't been updated and it only shows maybe 20 games on the mix, is the GOGmix still a priority?1 point
-
I still have access, yes. However I'm not sure if any games have been added in a while due to the slow pace at which we've been adding games recently.1 point
-
Wow that's incredibly generous of GOG, I'm glad we're finally getting some recognition that will be able to help us create better articles for more games.1 point


.thumb.png.1bfca9201a2ffeab2544225faf67e647.png)

.thumb.png.33c3a44d193ce4d2731da43fe11c2aa8.png)


